
M1 Garand Failure to Fire
When the M1 Garand has been out of service for a while a few common malfunctions can occur. These problems are normally very easy to resolve and this article will deal with one specific type of malfunction; a failure to fire. We define a failure to fire as the rifleman pulling the trigger and a loaded cartridge does not fire.
Most of the corrective actions we’ll be taking require that the rifle be field stripped. If you haven’t done so yet, field strip your rifle now. [Field Stripping your M1 Garand]. The corrective actions we list below come from the Army’s TM9-1275 manual.
Before beginning, verify that your M1 is unloaded by pulling the op-rod handle fully back and inspecting the chamber!
Getting Started:
This article assumes that a cartridge was loaded in the chamber when the failure to fire occurred. If the rifle failed to cycle, load, or eject a round then read the Failure to Cycle article.
The M1 Garand uses a floating firing pin. It is normal for the firing pin to lightly dent the primer upon chambering. Don’t confuse this with a light strike from a weak hammer blow!
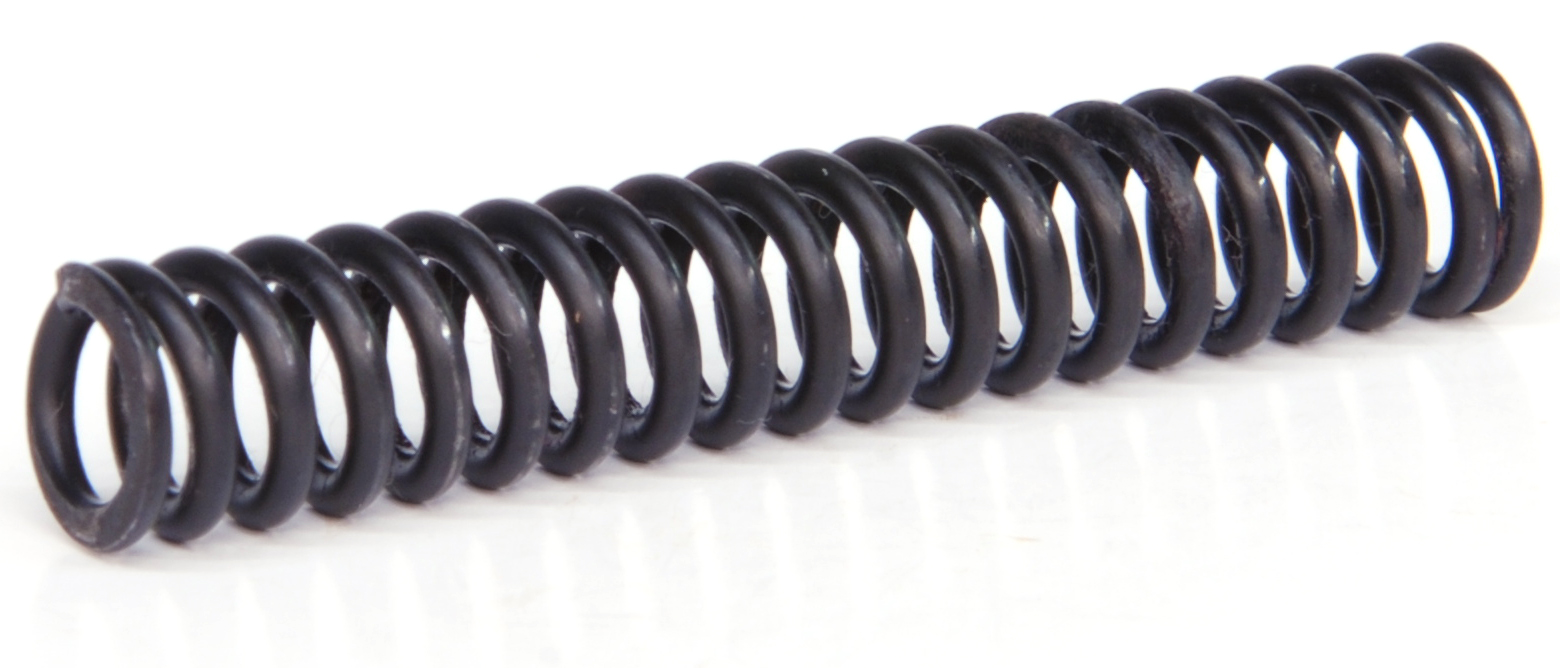
1 Weak Or Broken Hammer Spring:
A weak hammer spring may fail to drive the hammer forward against the firing pin with sufficient force to fire the cartridge. This is indicated by a light indent in the primer. Remove the spring from the trigger housing group as shown in the Detailed Strip article and replace it.
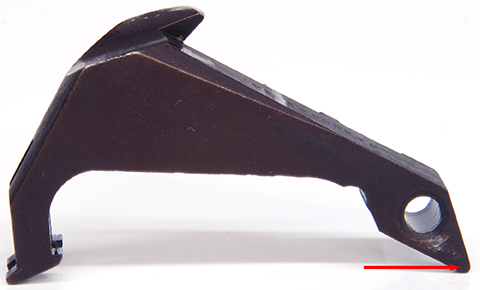
2 Lower Tang On Hammer Strikes Stud On Trigger Guard:
When the rear tang on the hammer strikes the stud on the trigger housing, the blow of the hammer will be reduced. It can also prevent it from going forward far enough to strike the firing pin. Remove the trigger housing group from the rifle, cock, and release the hammer. If the rear tang on the hammer is striking the stud on the trigger housing disassemble the trigger housing group as outlined in the detailed strip article and replace the hammer. This is a very uncommon failure. This type of failure would have been resolved before your M1 went into service.
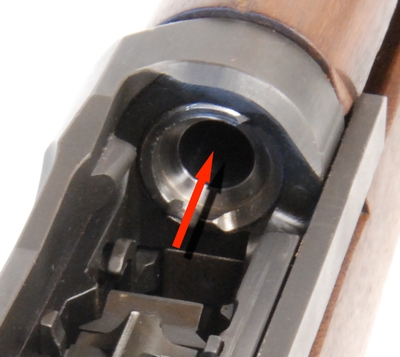
3 Broken Firing Pin:
It is not uncommon for a firing pin to break after being in service for several decades. Firing pins almost always break at the rear tang. The rear tang can be inspected for breakage without taking the bolt apart. If the firing pin looks intact, verify that the firing pin cannot be pulled out of the bolt without being disassembled. This checks to see that the firing pin hasn’t broken further inside the bolt.

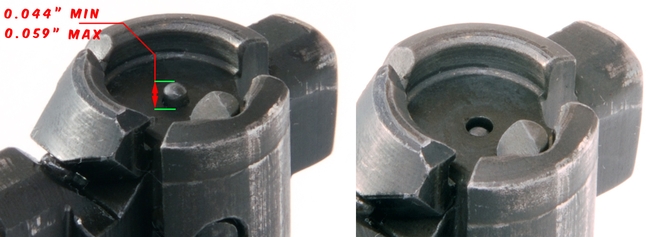
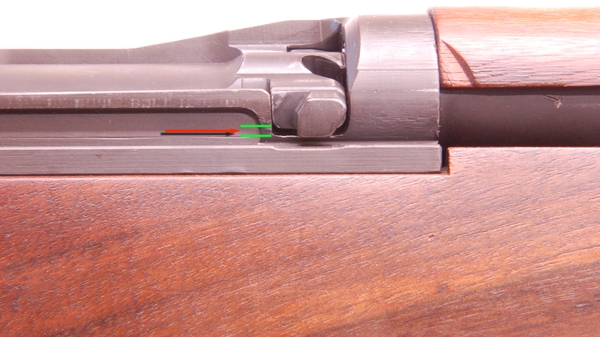
If the firing pin looks intact verify the firing pin protrudes far enough from the bolt face when fully depressed. The required dimensions are shown below. Inspect the tip of the firing pin that strikes the primer for chips.
4Bolt Fails to Close Completely:
If the bolt is unable to lock into battery, then two safety features will prevent the firing pin from striking the primer. The first is the safety bridge on the receiver. This safety prevents the firing pin from traveling forward when struck. The second is the camming lug on the hammer. If the bolt isn’t locked into battery the camming lug on the hammer strikes the rear of the bolt applying a torque to the bolt in an attempt to close it. If the bolt is unable to rotate then the hammer will stop its forward motion and be unable to strike the firing pin. There are several potential causes for this. We’ll list them below.
- Extractor Does Not Open Enough To Pass Over Rim Of Cartridge. The most common cause of the extractor failing to open sufficiently to pass over the rim of the cartridge is chips or foreign matter lodged between the heel of the extractor and the locking lug on the bolt which houses the extractor spring plunger. Remove the extractor, extractor spring plunger assembly, and cartridge ejector assembly. Clean all parts thoroughly. Check the extractor and extractor spring plunger for free action in their apertures in the bolt, as binding of these parts will prevent the extractor from opening.
- Operating Rod Binding. Inspect for binding between the barrel and receiver group and the operating rod by installing the rod and bolt in the rifle. As the rifle is tipped up and down, the rod and bolt should be moved from closed to open position and back by their own weight. If there is binding, inspect the tube for dents and the handle for deformation, which will cause binding of the underside of the lug on the cut in the receiver.
- Weak Or Broken Operating Rod Spring. The operating rod spring should be no more than 20.25″ in length. It’s very difficult for the user to determine the spring load and constant without some tools. Due to the low cost of operating rod springs we recommend replacing your spring if it shows excessive wear or the rifle is having reoccurring malfunctions.
- Rough Or Dirty Chamber. If the chamber becomes excessively dirty, a cartridge may bind and fail to chamber fully. This prevents the bolt from going into battery and the rifle fails to fire. Clean the rifle and use a chamber brush to remove any chamber deposits that might be present. Inspect the chamber for burrs.
- Insufficient Headspace. If there is not sufficient headspace on the rifle then the bolt contacts the cartridge before it locks into battery. To check your headspace be sure to read the headspace section in the following article. [Inspecting your M1 Garand]
5Hammer Fails to Cock after Firing:
This failure mode can be related to a failure to cycle, or it could be the hammer following the bolt home. This section will deal with the hammer following the bolt home. This failure mode normally occurs after the first shot. After a shot is fired the rifleman pulls the trigger and it goes all the way aft without resistance. In this case, the hammer failed to latch with the sear and is now uncocked.
The trigger assembly should be removed from the rifle and the hammer hooks and sear inspected. Review the M1 Garand Inspection Article and verify both the sear and hammer are in spec. Perform the trigger assembly safety test. If either the hammer or sear is damaged then they should be replaced.
Next, inspect the stock and look for signs that the stock is binding the trigger assembly. Some newly manufactured stocks are not correctly inletted and can bind the trigger assembly. For short stroke problems see the Failure to Cycle Article.
6Faulty or Defective Ammunition:
Older surplus ammunition can on occasion fail to fire. This is a very uncommon occurrence. After waiting 30 seconds with the rifle pointed in a safe direction eject the cartridge. Inspect the primer to determine if the primer was struck hard enough to fire. If additional cartridges fail to fire, switch to a different lot of ammunition. If the new ammunition also fails to fire then it’s likely a mechanical failure and not faulty or defective ammunition.
If a fired cartridge felt weak or different, always stop and check for barrel obstructions before firing again. Never attempt to shoot out a barrel obstruction!